Monday, April 25, 2011

Pot Roast

My mom made the best pot roast and it was always such yummy comfort food for me. I was in the mood for my mom's comfort food this week so I decided pot roast was in order. Plus, it always helps when the roast happened to be on sale at my favorite grocery store Publix (shout out for my husband) :)

Pot Roast
Yummy Flavorful Comfort Food

1 2-lb bottom round roast
5 carrots
3 celery
1/2 onion
4 cloves fresh garlic
5 potatoes
1 packet of onion soup
salt
pepper
garlic powder
oregano
basil
parsley
  1. If cooking in the oven; preheat to 350 degrees
  2. Quarter potatoes and chop carrots, celery and onion
  3. Wash roast and place in baking dish or crock pot
  4. Cut 4 slits (2 on each side) in the roast. Place garlic cloves in the slits
  5. Season very generously both sides of the roast with salt, pepper, garlic powder, oregano, basil and parsley
  6. Place quartered potatoes and chopped carrots, celery, and onion around the roast
  7. Place 1 packet of onion soup in a measuring cup and add 4 cups of warm water. Pour over everything and add more water if necessary to cover 3/4 of the roast and all the potatoes are submerged
  8. Sprinkle all the previous seasonings on everything and gently stir
  9. If cooking in the oven place lid on pan or cover tightly with foil for approx. 3 hours (time will depend on the size of the roast) and you have reached the appropriate internal temperature and vegetables are tender when poked
  10. If cooking in the crock pot cover with the lid and cook on low for approx. 8 hours or on high for 4 hours. Again, the time will vary depending on the size of your roast. Ensure the roast has reached the appropriate internal temperature and vegetables are tender when poked.
Recipe from my Mom

Friday, April 22, 2011

S'More Cookie Bars

With the recent increase in outside temperatures here in Sunny Florida my mind has started drifting to previous summers and camping. When we go camping there always has to be an evening of S'Mores! Which for those of you who know me know that I love S'Mores, but oddly enough in general I do not like chocolate or marshmallows. With my mind on camping and my cravings for S'Mores intensifying I knew something must be done fast. I began googling S'More bars in order to find a recipe that does not require camping and campfires :) I was amazed at the amount of S'More bar recipes on the Internet, but I decided to stick with the S'More Cookie Bar recipe from the trusty Hershey Chocolate site. Boy oh boy am I glad I tried this recipe! It was so yummy, moist and definitely took care of my S'More craving :)

S'More Cookie Bars
Yummy, Moist and Curves Your S'More Cravings

1/2 cup butter or margarine; softened
3/4 cup sugar
1 egg
1 teaspoon vanilla extract
1-1/3 cups all-purpose flour
3/4 cup graham cracker crumbs
1 teaspoon baking powder
1/4 teaspoon salt
4 (1.55 oz. each) Hershey's Milk Chocolate Bars
1 cup marshmallow creme
  1. Preheat oven to 350 degrees
  2. Grease 8-inch square baking pan
  3. Beat butter and sugar in large bowl until light and fluffy
  4. Add egg and vanilla; beat well
  5. Stir together flour, graham cracker crumbs, baking powder and salt; add to butter mixture, beating until blended
  6. Press half of dough into greased pan
  7. Arrange chocolate bars over dough, breaking as needed to fit
  8. Spread with marshmallow creme
  9. Scatter bits of remaining dough over marshmallow creme; carefully press to form a layer
  10. Bake 30 to 35 minutes or until lightly browned
  11. Cool completely in pan on wire rack
  12. Cut into bars. 16 bars.
Recipe from Hershey's Kitchens

Wednesday, April 20, 2011

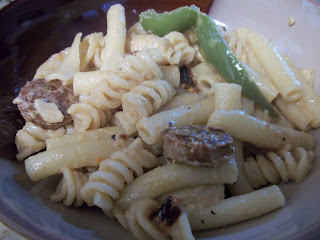
Sausage and Sun-dried Tomato Pasta

Now that I am working full-time and my husband works well over full-time we are not able to get to the grocery store as soon as we would like. So, I have found myself having to be very creative with the ingredients that I have on hand. As well as keeping in mind that we want it to be yummy and something that will warm-up well for future meals during our busy week. This recipe is not from scratch but it is still very yummy. Some may wonder why I am posting a post that is not from scratch, but the majority of my readers work full-time like me so this recipe will be perfect for them. The entire time I was in the kitchen cooking my husband was raving how yummy it smelled. Once it was served he continued to rave how yummy it tasted :)

Sausage and Sun-dried Tomato Pasta
Delicious Fast Weeknight Meal

1 package of pasta of your choice (I combined what I had on hand which was rotini and ziti)
1 package Mild Italian Sausage; cut into bite-size pieces
1-2 tablespoon extra virgin olive oil
1 tablespoon of oil from the sun-dried tomatoes
1 cup sun-dried tomatoes; chopped
1/2 green pepper sliced (or whatever vegetable you may have hand)
2 cloves fresh minced garlic
1 jar of Classico Alfredo Sauce
Pepper
  1. Cook pasta according to package directions
  2. In a large skillet heat both oils over medium-high heat
  3. Add sausage and saute until cooked 
  4. Add sun-dried tomatoes and green pepper (or vegetable of your choice) and saute for approx. 5 minutes to allow the sausage to absorb the flavors
  5. Add fresh minced garlic and saute just until the smell becomes fragrant
  6. Add alfredo sauce and lower heat to low and cover skillet. Allow to simmer for 5-7 minutes.
  7. Add cooked pasta to skillet and stir until combined
  8. Sprinkle with pepper and serve immediately
Recipe created by Me

Monday, April 18, 2011

Baked Mahi Mahi

I am not sure why but for some reason I have had this subconscious fear of cooking seafood especially fish. I have always been afraid that I would not be able to tell when it is cooked through and I would then overcook it. I was raised loving seafood and my dad is by far the best cook when it comes to seafood. I have never tasted such flavorful and delicious seafood as I have when he cooks it. There once was a comedian that said something along the lines that he would never understand the people who say they love seafood but then smother it in tartar and cocktail sauce lol. That is me except when my dad prepares seafood! When I order seafood at a restaurant I have to have bowl of tartar sauce so I was determined to prepare seafood like my dad does. Please forgive me but I must compliment myself on this recipe I made. It was phenomenal and I didn't need any tartar sauce! After talking with my dad I bit the bullet and conquered my fear in the kitchen and can I say I am so glad that I did. This recipe was DELICIOUS!

Baked Mahi Mahi
Phenomenally Delicious

2 Mahi Mahi Fillets
1 lemon
1-2 tablespoons Butter
2 cloves minced garlic
garlic powder
onion powder
complete seasoning
salt
pepper
  1. Preheat oven to 350 degrees
  2. Wash Mahi Mahi fillets and place each on their own piece of foil
  3. Squeeze lemon juice on fillets and place 2 lemon slices on top of foil
  4. Place butter and minced garlic on top of fish. For the butter and minced garlic measurement divide by 4 to ensure you season both side of each fillet for a total of 4 sides.
  5. Sprinkle generously with garlic powder, onion powder, complete seasoning, salt and pepper
  6. Place seasoned side down on top of lemon wedges.
  7. Repeat steps 2-4 for the top side of the fillet. Place 2 lemon slices on top of fillet
  8. Repeat steps 2-6 for the second fillet
  9. Close foil tightly but ensure their is a space between the foil and fillets. In essence you are creating a pocket so the fish is also steamed
  10. Bake for approx. 20 minutes or until fish is opaque and beginning to become flaky. Do not overcook the fish because is will dry out very fast 
  11. Serve immediately
Recipe inspired by my Dad and created by Me

Friday, April 15, 2011

Shortbread Cookies

My Uncle owns a bakery in North Carolina and one of my favorite cookies at his bakery is shortbread. Being that I only get his yummy goodies a few times a year, when I came across this recipe I knew that I had to give it a try. Of course, I don't come anywhere close to my Uncle's from scratch bakery but this recipe was yummy enough to hold me over till my next North Carolina trip :) The day I was making this recipe I just so happened to be on the phone with him. He asked me what I was doing with the noise in the background so I proceeded to tell him I was cutting butter into flour lol. He of course made sure I was using REAL butter! So, my advice handed down from my Uncle the baker when you make this recipe use REAL butter :)

Shortbread Cookies
A Treat that Is Not Super Sweet

1 1/4 cups all-purpose flour
3 tablespoons sugar
1/2 cup butter; I let the butter sit out to room temperature in order to cut it into the flour with ease
  1. Preheat oven to 325 degrees
  2. In a medium bowl combine flour and sugar. Using a pasty blender (or I use 2 butter knives to cut the butter in) cut in butter until mixture resembles fine crumbs and starts to cling
  3. Form the mixture into a ball and knead until smooth
  4. To make shortbread wedges, on an ungreased cookie sheet pat or roll the dough into an 8-inch circle
  5. Make a scalloped edge
  6. Cut circle into 16 wedges (I only got 8 wedges out of it)
  7. Leave wedges in the circle
  8. Bake for 25-30 minutes or until bottom just starts to brown and center is set
  9. Cut circle into wedges again while warm
  10. Cool on cookie sheet 5 minutes
  11. I sprinkled the cookies with sugar while they were still warm and cooling
  12. Transfer wedges to a wire rack and let cool (I skipped this last step)
Recipe from Better Homes and Gardens New CookBook 15th edition

Wednesday, April 13, 2011

Uncle George's Chicken

This is one of my favorite ways to make baked chicken. The only thing I have noticed about making chicken this way is that dark meat absorbs the flavor so much better. White meat still comes out very yummy, but everyone usually comments on how wonderful and flavorful the dark meat is.

Uncle George's Chicken
Fast, Flavorful and Moist

Chicken (preferably dark meat with bone)
1 packet of Chicken Bouillon
Worchestershire Sauce
Garlic Powder
Mrs. Dash
Salt
Pepper
  1. Preheat oven to 350 degrees
  2. Wash chicken and place in a baking plan
  3. Season top and bottom of chicken with chicken bouillon, worchestershire sauce, garlic powder, mrs. dash, salt and pepper
  4. Put a small amount of water in the pan (enough to cover a small layer in the entire pan)
  5. Bake uncoverd for approximately 1 hour or until outside is lightly brown, inside is no longer pink or correct internal temperature is reached 
Recipe from my Uncle George

Sunday, April 10, 2011

Creamy Chicken and Broccoli Pasta

This pasta dish is yummy! It is also fairly easy to make, and is perfect for a easy clean-up because it is a one skillet recipe. What could be any better than that? A yummy dinner with only one skillet to clean-up!

Creamy Chicken and Broccoli Pasta
Delicious, Fast Clean-Up and Perfect for Warm-up's

12-ounce box of Mueller's Bowties
3 tablespoons olive oil
1-pound boneless, skinless chicken breast; cut into thin strips
Salt and pepper; if desired
3 cups broccoli florets (I used frozen)
2 small red bell pepper (I had green on hand); cut into thin strips
1 can chicken broth (I dissolved 2 packets of chicken bouillon in 14-ounces of warm water)
1 container of President Rondele Gourmet Spreadable Cheese Garlic and Herbs
  1. Cook and drain Bowties according to package directions
  2. In a large skillet, heat olive oil over medium heat
  3. Add chicken (I salted and peppered the chicken). Cook and stir 3-5 minutes or until chicken is cooked through and lightly brown
  4. Remove chicken and add broccoli, red peppers, and chicken broth. Cover and cook, stirring occasionally, 5-7 minutes or until broccoli and peppers are tender
  5. Return chicken to skillet and cook 1 minute longer. Remove from heat
  6. Add cheese then pasta combining gently until cheese is melted and smooth
  7. Serve immediately
Recipe from my Aunt

Monday, April 4, 2011

Island Chicken

Okay, so I am going to warn you now that the picture for this recipe does not do it justice! The picture may not make this recipe look appetizing, but I promise you the flavor is outstanding. It has a sweet flavor with a kick. This recipe is easy to tweak depending on the level of spice you like. You could omit the hot sauce all together or add more. This recipe has become one of my husband's favorite! Also, with left overs I added it to fettuccine Alfredo and it was delicious! 

Island Chicken
Chicken with a sweet glaze and a kick


4 boneless skinless chicken breast (I used 3)
2 tablespoons olive oil

Rub:
2 teaspoons salt
1/2 teaspoon black pepper
1 teaspoon ground cumin*
1 teaspoon chili powder*
1 teaspoon cinnamon

Glaze:
1 cup packed brown sugar
2 tablespoons finely chopped garlic (I used minced)
1 tablespoon Tabasco sauce (or desired amount)
  1. Preheat oven to 350 degees
  2. Stir together ingredients for the rub
  3. Pound the chicken breast between two pieces of plastic wrap until they are thin
  4. Coat the chicken with the spice rub on all sides
  5. Stir together glaze ingredients; set aside
  6. Heat oil in a frying pan over moderately high heat and brown chicken on both sides. Place browned chicken breast onto a baking sheet
  7. Pat the glaze mixture on the top of all the chicken breasts and then roast in the oven for about 20 minutes
  8. When chicken is cooked through remove from oven and cover with foil to rest for 5-10 minutes before serving
*I am not a big fan of cumin so I half the cumin and double the chili powder.

Recipe from my cousin Alison